Guide provided as it is with no warranty of any kind.
Managing Email Accounts
Requirement: You need to access the Administrator Management Interface to perform the following task.
Accessing Mail Management
To access email
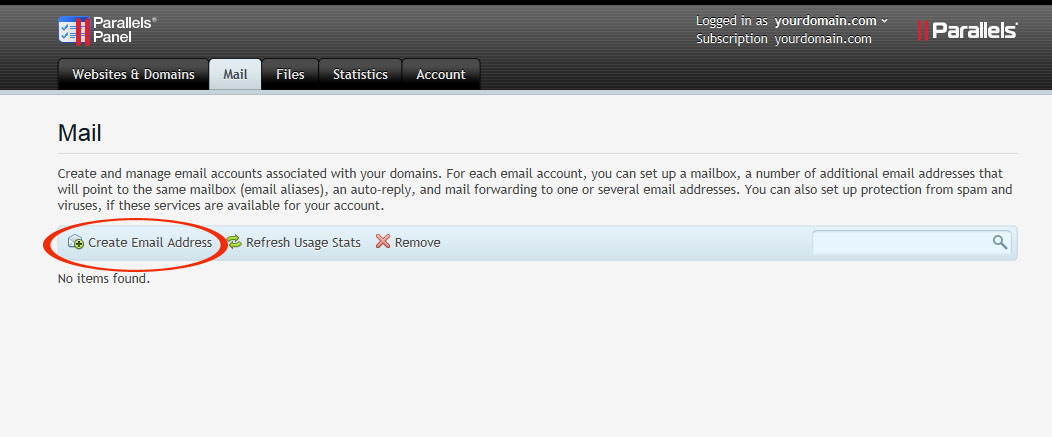
management interface, click "Mail". You will see

Add/Edit/Delete Email Accounts
To
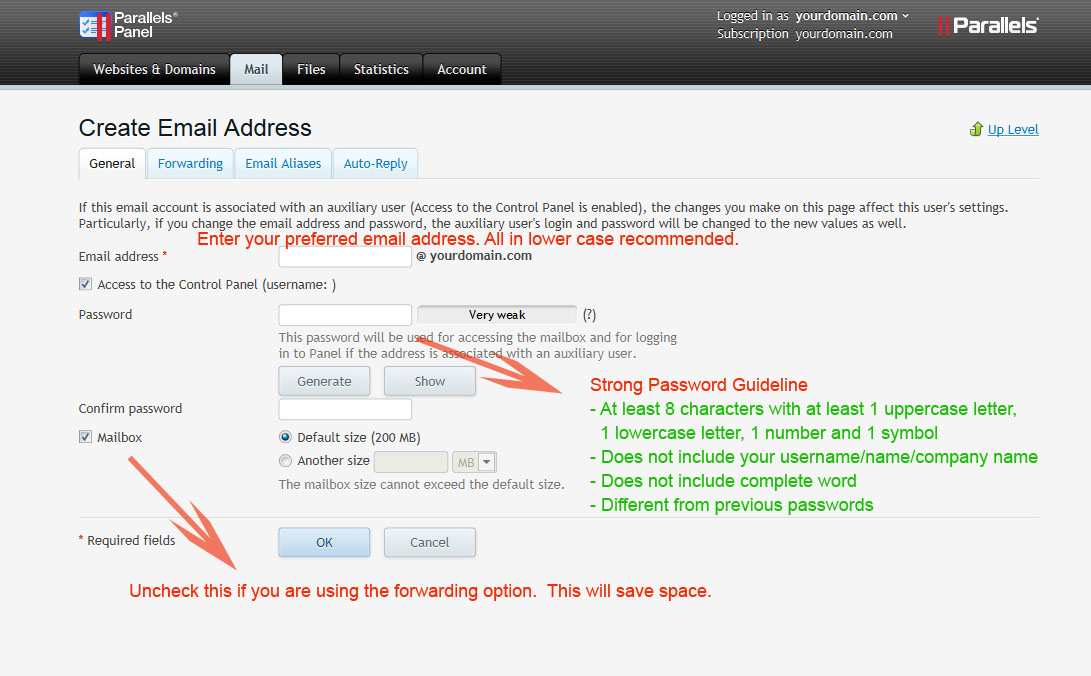
create email accounts, click "Create Email Address".

To add an email alias:
An email alias is a method of mapping a nickname to an actual email address or addresses. Alias allows a mailbox to receive email for many email addresses.
Example
John is the sales manager and is taking care of all sales. He needs to
have both john@domain.com and sales@domain.com.
You can create 2 mail-name each a mailbox but for convenience, john wants to
have only 1 mailbox. For this, you just need to add "sales" as
mail-name with mailbox and add "john" as an alias or vice versa.
Click Email Alias
Click Add an Alias and add the necessary alias.
To
change user password
If your user has forgotten the password, you can reset for them.
Click on the Email Address
Click on the "General" button.
Enter the new password and save it.
To
change user quota
To adjust user quota
Click on the "General" button.
Enter the new quota and save it.
# Each account has a default limit for each user. If you need high limit, please contact Tech Support. Depending on your requirements, there may be a need to upgrade the hosting plan.
To add a
Forwarder/Redirector
A forwarder forward emails to another email address. Please note that
account will still continue to store emails unless the mailbox is disabled.
Click on the "Forwarding" button.
Enter the email address to forward to
Check the checkbox and click OK to switch it.
To Stop a Forwarder/Redirector
Click on the "Forwarding" button.
Enter the email address to forward to
Uncheck the checkbox and click OK to disable it.
To
disable mailbox after redirecting.
After setting a redirect, you may want to disable the mailbox so that it will
not take up space.
Click on General
Uncheck the MailBox checkbox to Disable it. (Server will no longer store emails on the server)
Catch-all
Account
An "catch-all" alias will catch all emails to the domain that belongs
to nobody. Due to massive amount of global spamming, this feature is
no longer useful and may bring more harm than good. In the end, the
catch-all will just be collecting lots of virus messages addressed to
non-existence email addresses.
As such, we have disable Catch-All account feature. We recommend using Email Alias to create more address that may potentially receive emails.
If for certain reasons Catch-All is needed, please write in to Technical Support requesting and justifying it.
To add/disable an AutoResponder
/ Auto Reply / Vacation Message:
An autoresponder is a prepared reply that is automatically returned to
incoming email. You can use it to reply to standard requests, such as retail
orders, or to reply to internal users when you are out of the office.
Click Auto Reply
Check "Switch On" to enable it. (Uncheck to "Switch Off" if you don't need this anymore)
Edit the message (please keep max response to unique email address to 2 a day)
User Self
Administration
If you allow Control Panel access
to your users, your users can also log to their personal interface at usual link
at http://yourdomain:8443. Your
user can enter their full email address as the login and password to
access.